Friday, April 29, 2016

Tuesday, April 26, 2016

4/26-4/27: ACTION PHOTO ASSIGNMENTS DUE: 5/5-5/6

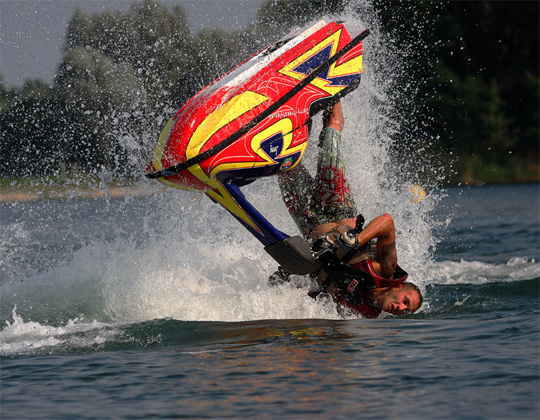
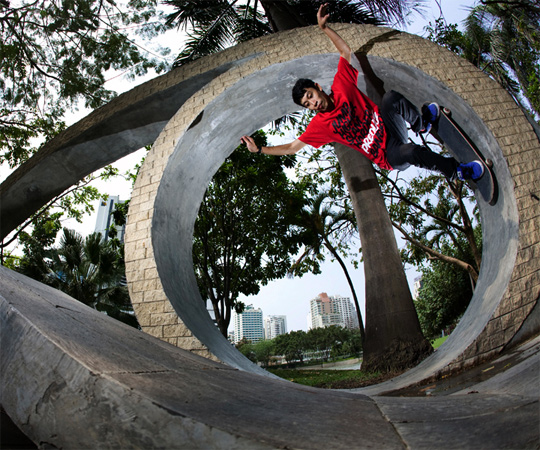
You will shoot action photos at two locations over the next week. One of these photo shoots must take place at a Shorecrest related event or sport. For example, you could take pictures of the Hip Hop, Football, Soccer, or Flag teams. You are required to speak to the coach/advisor letting them know that you will be taking pictures. 
Let me know if you want to shoot on the sideline during a game or match. The other location can be a place of your choice. Skateboarding, horseback riding, and dancing are all acceptable activities. For each shoot you will be turning in a contact sheet of 24 pictures. To get 24 good pictures you are likely to take 100 pictures!
  • Tues. 5/1 (Per 2) & Wed. 5/4 (Per 3):  Visiting photographer, Geoff Vlcek
  • Th. 5/5 (Per 2) & Fri. 5/6 (Per 3): Off Campus ACTION SHOOT: 
    • 24 photo contact sheet labeled Action1 
    • Highlight your 3 best shots

  • Homework due Th. 5/5 (Per2) & Fri. 5/6 (Per 5): Shorecrest Event/Sport ACTION SHOOT:
    • You must take photos at a Shorecrest related event or sport. 
    • You must show evidence of your contact with the coach or advisor. This can be a copy of an email, or a note signed by the him/her. (GRADED POINTS)
    • It is ideal and most exciting to photograph games and performances. If you have scheduling conflicts with going to an event, you will need to arrange to work with student athletes/performers to dress in their uniforms and perform at arranged time. 
    • 24 photo contact sheet labeled SCAction
    • Highlight your 3 best shots

4/26-4/27: INTRODUCTION TO ACTION PHOTOGRAPHY

Read and take notes (graded) on the following links with Action Photo Tips:

Here is a link to some great action photos. Please notice how most of these photos show engaging action in an interesting location. You will shoot similar photos during our Action Photo unit.

action photographyaction photography

Monday, April 25, 2016

4/25: DOF EDITING & SUBMITTING

  • Submit 4 sets of 4 DOF images each = 16 Best EDITED pictures contact sheet
  • 2 sets of pics should be from on-campus, & 2 sets should be from off-campus
  • Each set should have 4 pictures of the same objects, but the DEPTH OF FIELD changes from 1 pic to the next.

Friday, April 15, 2016

4/15: DEPTH OF FIELD (DoF) ASSIGNMENT (On-Campus Assignment)


 The goal of this assignment is to get a better understanding of how to control Depth of Field (DoF), or the area in your picture that is in focus. You will be working with a partner, and photograph a series of DoF images of various still-life arrangements. You should bring in 4-6 objects with the same theme and some variety. Consider if the objects are interesting and eye catching. Examples: apples, pool balls, Hershey Kisses, coffee cups, shoes, nail polishes, baseball hats, or nesting dolls, etc. I will also have objects that you may use. The objects should be setup at specific distances from where you will place your camera. You may be creating a DOF chart like the examples from the Internet that are shown below. Use your handouts and charts to help you. You will experiment with having a shallow DoF, or selective focus, to having a large depth of field where everything may be in focus.

BEFORE YOU TAKE YOUR PICTURES:
  1. Read and watch the videos about Depth of Field (DOF) on my blog, mskingphotoclass.blogspot.com
  2. You will need a tripod and a DSLR camera with a 55 mm lens.
  3. If sharing the camera, GET AN EXTRA SD CARD. Check that your battery is charged, and lens is clean.
  4. Set your ISO to__________________. (Ask your teacher for correct setting)
  5. Set your camera up about 2 feet from the objects. The objects should be set up in a diagonal line that gradually goes further away, or at varied distances from the camera. 
  6. USE MANUAL FOCUS - DO NOT CHANGE THE FOCUS ON YOUR LENS BETWEEN THESE SHOTS! Be careful NOT to move the camera, don't change focus between images, just aperture and shutter speed.
  7. Focus on the object that is second closest to you. You may need to move the camera to focus (by pressing down half way) and then moving your camera to re-compose the picture. Set your F-stop according to the chart and use your meter to set the correct shutter speed. This means that your meter will read ‘0’ when you adjust the shutter.
  8. WHEN FINISHED, YOU WILL HAVE A TOTAL OF 24 PICTURES.
  9. Be sure to be back 15 minutes before the end of class.
  10. Create a contact sheet titled, DOF1 and attach submit it in Google Classroom

SUBJECT
PICTURES # AND APERTURE SETTING:
LENS

MODE:
SHUTTER SPEED
Composition #1

1. Biggest Aperture (F5.6 or bigger)
2. Close down a few stops (F8)
3. Close down more stops (F11 or F16?)
4. Smallest Aperture (F22 or smaller)

Zoom IN completely
Manual (M)
Adjust EACH picture for correct exposure!
Composition #2
Pictures 5-8: Repeat from  1-4


Zoom OUT a little.
Aperture Priority (A)

Camera will do automatically

Composition #3
Pictures 9-12: Repeat from  1-4
Zoom OUT a little. More

Manual (M)
Adjust EACH picture for correct exposure!
Composition #4
Pictures 13-16: Repeat from  1-4


Zoom OUT  completely.
Aperture Priority (A)
Camera will do automatically
Composition #5
Pictures 17-20: Repeat from  1-4


Your choice
Manual (M)
Adjust EACH picture for correct exposure!
Composition #6
Pictures 21-24: Repeat from  1-4


Your choice
Aperture Priority (A)
Camera will do automatically


Thursday, April 14, 2016

4/13-14: DEPTH OF FIELD ASSIGNMENT (OFF-CAMPUS ASSIGNMENT)


DIGITAL PHOTOGRAPHY:  DEPTH OF FIELD ASSIGNMENT (OFF-CAMPUS ASSIGNMENT)

The goal of this assignment is to get a better understanding of how to control Depth of Field (DoF), or the area in your picture that is in focus.  You will experiment with having a shallow DoF, or selective focus, to having a large depth of field where everything may be in focus.  You will take 24 pictures total.  Be sure to be back 15 minutes before the end of class and upload your contact sheet titled, DOF1.

BEFORE YOU TAKE YOUR PICTURES:
  1. Set your ISO to__________________. (Ask your teacher for correct setting)
  2. Check that your battery is charged, and lens is clean.
  3. Zoom in according to chart.
  4. Take pictures that have 3 ‘objects’ in each image.  One object should be close to you (approximately 2-4’ away from the camera, the second object should be a little further, and the third object can be very far away from you.
  5. YOU WILL FOCUS ON THE OBJECT THAT IS SECOND FURTHEST FROM YOU.
  6. USE MANUAL FOCUS- DO NOT CHANGE THE FOCUS ON YOUR LENS BETWEEN THESE SHOTS! Be careful NOT to move the camera, don't change focus between images, just aperture and shutter speed.

SUBJECT
PICTURES # AND APERTURE SETTING:
LENS

MODE:
SHUTTER SPEED
Composition #1

1. Biggest Aperture (F5.6 or bigger)
2. Close down a few stops (F8)
3. Close down more stops (F11 or F16?)
4. Smallest Aperture (F22 or smaller)

Zoom IN completely
Manual (M)
Adjust EACH picture for correct exposure!
Composition #2
Pictures 5-8: Repeat from  1-4


Zoom OUT a little.
Aperture Priority (A)

Camera will do automatically

Composition #1
Pictures 9-12: Repeat from  1-4
Zoom OUT a little. More

Manual (M)
Adjust EACH picture for correct exposure!
Composition #4
Pictures 13-16: Repeat from  1-4


Zoom OUT  completely.
Aperture Priority (A)
Camera will do automatically
Composition #5
Pictures 17-20: Repeat from  1-4


Your choice
Manual (M)
Adjust EACH picture for correct exposure!
Composition #6
Pictures 21-24: Repeat from  1-4


Your choice
Aperture Priority (A)
Camera will do automatically

TIPS & SUGGESTIONS:
  1. Use your notes and handouts from class.
  2. Check that you know how to:
    1. Change the Aperture (F-stops), shutter speed, and use the Manual and Aperture Priority modes.
    2. Meter your image to get the correct exposure.
  3. Be sure to focus before you take your picture
  4. Use a tripod.  If you do not use a tripod, be aware that you will likely have blurry pictures at shutter speeds slower than 1/30, so at least stabilize yourself by anchoring your arms.
  5. As always, compose your images carefully, and pick interesting subject matter.  Maybe people for some images?
  6. Experiment with how far away subjects are from your camera, as that effects DoF

Monday, April 11, 2016

4/11: HOMEWORK: A DAY IN THE LIFE OF YOUR SPRING BREAK. DUE: 4/26-4/27

DOCUMENTARY PHOTOGRAPHY Homework DUE 4/26 & 4/27
  • 24 pictures documenting your life (over spring break)
  • Titled: Springbreak_CS
  • HIGHLIGHT THE NUMBERS OF YOUR BEST 1-3 IMAGES!! 
Over spring break you will be a documentary photographer of your own life. You will take a series of at least 24 quality photos over a period of time that documents your life. You can either take a series of pictures over the course of one day or over the week. The pictures should show various aspects of you life from when you wake up to when you go to bed. All pictures should be school appropriate.
Photojournalism is kind of journalism that tells a story through photographs. Documentary photography records history and everyday life through photography. Professional photojournalists travel the world documenting world events, sometimes risking their lives to show what is happening in the world.


Henri Bresson, French photographer
Migrant Mother, by Dorothea Lange 
She documented the Great Depression.


Other photojournalists:
Robert Doisneau, French photographer
Robert Capa,
Kenji Nagai, Japanese photojournalist
Matthew Brady documented the American Civil War.
Walker Evans documented the Great Depression.

Thursday, April 7, 2016

4/7-8: VIDEOS FOR UNDERSTANDING DEPTH OF FIELD

Watch the following videos and take notes on Depth of Field, or DOF, aperture, and shutter speed.
    1. Lesson 5 - Depth of Field (DOF) by easy exposure https://www.youtube.com/watch?v=DKwlbYXxRC4
    1. Depth of Field : Photography Tutorial for Beginners (Bokeh) - CamCrunch https://www.youtube.com/watch?v=iHxG1f3X1f4

4/7-8: APERTURE AND DEPTH OF FIELD

Your next assignment will focus on Depth of Field. To learn more about exposure and DOF (Depth of Field), please see the information below, which is from the book "Photography," by Upton and Upton.


Tuesday, April 5, 2016

4/5 & 4/6: MID-TERM REVIEW & ART WOLFE'S PHOTO SUGGESTIONS

Photographer Art Wolfe's suggestions for taking good pictures are in the link below
http://iconicimagesinternational.com/wp-content/uploads/Art-Wolfe-Presentation-Summary-Notes.pdf

Review the following:


  1. Repetition
  2. Rule of Thirds
  3. Selective Focus
  4. Depth of Field, DoF
  5. Aperture
  6. F-stop
  7. Shutter
  8. Changing to Grayscale
  9. Layout - lanscape (horizontal), or portrait (vertical)
  10. Frame within a frame
  11. Mergers
  12. Emphasis
  13. Contrast
  14. Value
  15. Balance: Symmetry/Asymmetry
  16. Composition
  17. Landscapes: Horizon in the upper or lower third
  18. Fill the Frame
  19. Different angles
  20. Correct Exposure
  21. ISO 
  22. Manual Photo 'Triangle' = ISO, Aperture, Shutter